 Image Tile Map Service
Builds insert-able images from internet based TMS (Slippy Tile) servers.
Keyboard Command: ImgTmsTil
Procedure:
- Open the drawing you wish to insert images into.
- Confirm the appropriate drawing coordinate system has been assigned.
- Zoom to the desired area (see note below).
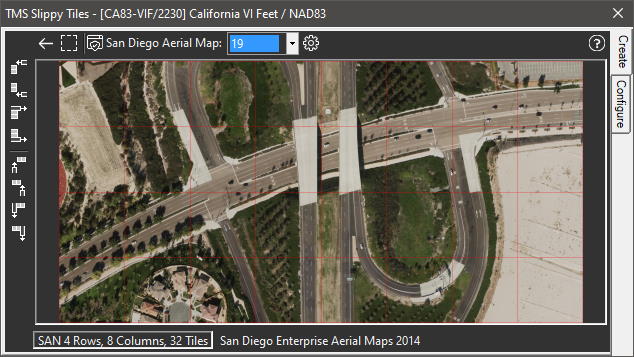
- Initiate this tool.
- Use the Window Select button to choose a tight window around the area.
- Use the Zoom dropdown to choose the zoom level.
- Click the button to generate the image.
- Optionally use the adjacent buttons to add/remove rows/columns.
- Click the Insert Image button to insert the image into the drawing.
Important Notes:
- It is your responsibility to read and understand the copyrights and usage rights (terms of use) that each provider allows. Follow the links displayed at the bottom of the dialog and/or use a web browser to learn what your rights are before using any imagery. Along these lines we highly recommend the OSM, MAP, and SAT options for the most freedom of use.
- The content being downloaded is (except AUS NearMap) free. However the providers of these images must maintain servers (cost) and bandwidth (cost) so for them it's not free. In order to keep this content free don't abuse the system! Get to know the results from the various servers, zoom tightly on your area of interest, use the window selection to narrow if it doesn't fill the viewport, and use the lowest zoom level (or resolution) that produces satisfactory results.
General Notes:
- The imported image(s) should be used for general reference only. Use extreme caution when tracing geometry onto images especially if the image represents a large scale area.
- This tool builds its images based on the extents of the current view when the tool is initiated. It is highly recommended you zoom in tightly to the area of interest. Also consider using the select window button to fit the area so there is no wasted area, this keeps the image size down and gives the best results.
- The application caches images that are likely to be reused (for increased speed on the next use). These files are store in your user temp folder under the Web Map Cache subfolder. This may be removed or emptied at any time with the understanding the files may have to be downloaded again.
Configuration
Click on the tab to make changes to the server information.
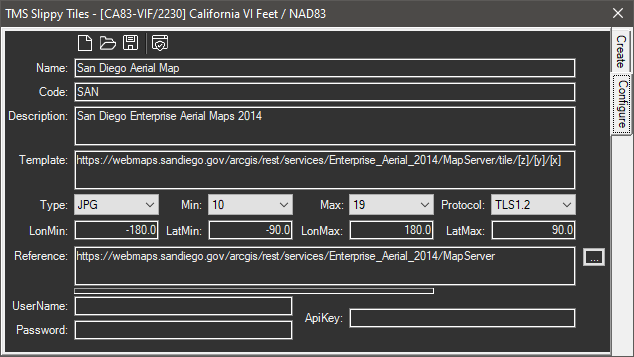
- To add a new server, click the new icon and supply a name not listed. Then proceed to change all the fields below.
- The current parameters are saved when the dialog closes and are reloaded when it's restarted.
- To view a web page containing information about servers you might be able to use, click the last icon.
Note: If you use multiple TMS servers, you can store your configuration information into a .TMS file for later recall. If you are operating in a group environment, consider placing the files in a shared folder for other group members to access.