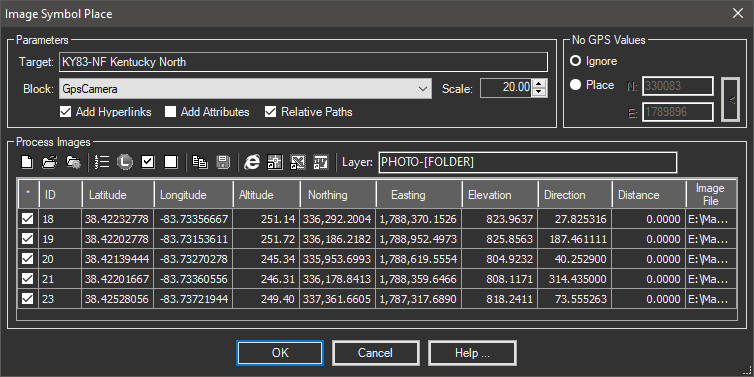
Inserts blocks into the drawing based on extended GPS information in image files (such as Lat/Long).
Keyboard Command: ImgSymPlc

Procedure:
- Open the drawing you plan to plot the image locations in.
- Make sure the block to be inserted is defined in the current drawing.
- Initiate the Image Symbols tool from the menu, ribbon or command above.
- Choose the block to use and the desired scale.
- Designate other options as desired.
- Click the button to choose the image files to process.
- Choose the button to begin processing.
Details:
- Add Attributes: If you add attributes tags to the block definition used they can be populated during insert.
- ID: The ID number displayed in the grid.
- FILENAME: The full filename.
- FILESIZE: The file size in KB.
- FILEDATE: The image date.
- FILETIME: The image time.
- Others: We also check for the existence of TAGS matching the EXIF property tags names and fill the block attributes if they exist. Those names are standardized but whether they exist varies with the camera. A complete index of numeric EXIF codes can be found on the Internet, search for "Numeric EXIF Codes" (without the quotes).
- Alternate Folders: An alternative folder select button allows selection of a folder. If one is chosen, all images in that folder and all subfolders under it are added to the list.
- Default ID: The default ID is based on the numeric portion of the image file name. To quickly change the IDs sequentially, enter the starting value in the first row, then click the button.
- Layer Field: The Layer field allows the layer of each insert to be set by using a string template.
- Use ordinary text combined with EXIF numeric codes inside square brackets. In the dialog example, the [306] will be replaced with the EXIF Image DateTime value (if it's present in the image properties). You can also use a portion of an EXIF field. For example, [306,0,8] will extract 8 characters from EXIF 306 beginning with the first character (0).
- You can also include the last portion of the file path with a [FOLDER] field. For example
D:\Path\SubFolder\IMG-001.jpgwould extract the string SubFolder.
Notes:
- After choosing the image files, the grid will be populated with relevant data. This can take a while depending on the number of images and the speed of the system you are using.
- After selecting image files, you can limit those actually drawn by using the button to select a closed object or rectangle. Images outside the selected area will have their toggle (leftmost column) turned off.
- If you use a custom block other than the built-in GPSCAMERA block, it must point to the right (to match the CAD engines default of 0° being to the right).
 Image Symbol Place