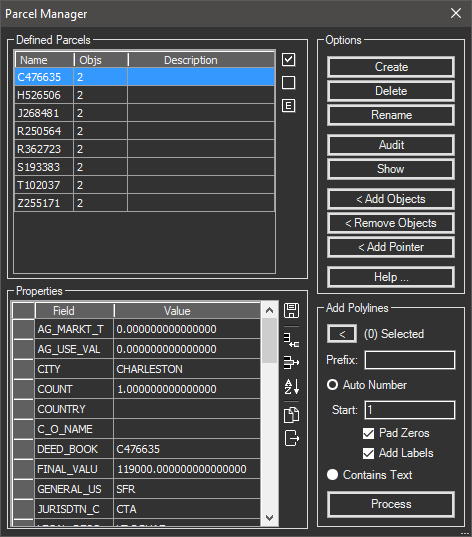
The parcel manager is used to create named parcels from unnamed geometry. It is designed for use in the AutoCAD engine (not Civil3D).
Keyboard Command: ParManDia

Important Note: A parcel can contain a single closed polyline, or it can contain a collection of lines and arcs. You cannot use open polylines as part of parcels, nor can you use lines and arcs along with a closed parcel.
Parcel List:
This list will display all the parcels defined in the current drawing. These buttons are used to control the selection list.
- Select All: Selects all items in the list.
- Clear All: Clears all selected items.
- Select Empty: This can be a good step before the Delete tool. It selects all parcels on the list that do not have any objects assigned to it.
Properties:
Each parcel can have multiple properties assigned to it. These properties are a collection of field = value combinations.
Note: There is a system setting that controls whether these properties are displayed in reports, the default is on (true).
Options:
These buttons are used to create, manipulate, and delete parcels.
- Create: Create a new parcel. A small dialog will appear allowing you to enter the parcel name. The default name offered is based on the current date/time.
Note: After creating a parcel, it's a good idea to immediately add objects to it.
- Delete: Deletes the selected parcels and provides an option to delete the linked geometry.
Note: Use caution with this option! If the parcel contains a leg (line/arc) that is shared with another parcel, it can leave the shared parcel open. In this case you may want to preserve the geometry (choose No) and use AutoCAD to erase the geometry.
- Rename: Allows you to rename the selected parcel.
- Audit: Evaluates selected parcels for problems. If problems are found, the errors will be displayed at the AutoCAD command prompt. Press F2 to display AutoCAD's command history to review the errors.
- Show: Zooms the AutoCAD window to show the selected parcel. The geometry defined in the parcel is highlighted. After confirmation, the display will be restored to its previous state.
- < Add Objects: Hides the dialog and lets you select a single closed polyline, or a collection of line/arc objects to add to the selected parcel.
After adding line/arc objects to a parcel, its a good idea to immediately add a pointer to it.
- < Remove Objects: Hides the dialog and lets you select objects to remove from the selected parcel.
- < Add Pointer: When a collection of lines and arcs make up a parcel, it needs a method to determine the beginning point and direction. This is done through the use of a pointer, which is actually a small block that is bound to the parcel collection.
The insertion point of the block determines the beginning point of the description, and the rotation angle determines the direction.
You will be prompted to pick two points. If this second point is on a line segment, you can pick anywhere along the line using the nearest osnap. However if the first segment is a curve, you must use the endpoint osnap to pick the other end of the curve!
- Add Polylines: The tool can be used to add hundreds of closed polylines to the parcel collection in one quick operation.
- < Select: Select all the polylines in the drawing you wish to process. It is sometimes helpful to have frozen all other layers before beginning.
- Prefix: Can be used to add intermediate characters such as subdivision stages, etc. In the example above if "PH1-" (without the quotes) were used, the first name would be PH1-0001.
- Starting: The number to use for the first parcel, incremented by one each time.
- Pad Numbers: Right sets the number in a collection of four zeros. For example 1 becomes "0001" and 123 becomes "0123". This prevents problems finding the parcel later in the sorted list. Without padding, a list of 13 lots sorts as 1,10,11,12,13,2,3 ...
- Label Parcels: This makes it easy to find parcels on the drawing afterwards. The label is placed at the centroid of the polyline. Note that in U or L shaped polylines, the centroid may fall outside the polyline.
- Process: Begins processing of selected polylines.
Notes:
- Parcels do not support commencement paths. If you have a reference path, use the Objects tab of the Description generator to process.
- Certain buttons may be disabled depending on the status of the list. For example the button will not be available until one (or more) items have been selected. Another example is the button, which is only enabled if one (not more) item is selected.
- The number of objects contained within the named parcel is displayed at the bottom of the list if a single parcel is selected.
 Parcel Manager