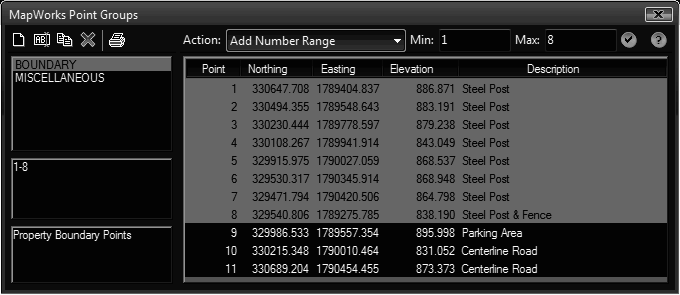
Manage point groups including adding, deleting, renaming and more. Once a group has been established (or selected) you can change the included points using many different methods. You can change the text (middle left) or manually select (and de-select) using list list on the right. The Action menu provides tools to handle numerous selections by ranges and more.
Keyboard Command: PntGrpMgr

Groups (Left Pane) Details:
- New: Adds a new (empty) point group to the drawing. Follow this by entering a description and selecting the points that belong to the new group.
- Copy: Creates a copy of an existing group, including the points that belong to the group. First select the source group, then click the button and supply a valid name. Follow this by changing the description (also copied) and adding/removing points on the group.
- Delete: Immediately deletes the selected group from the drawing.
- Rename: Renames an existing group. Select the group to rename, click the button and supply a new valid name.
- Print: Produces a printable report of all the groups in the drawing, including the description and point range specification.
Point Data (Right Pane) Details:
- Action: Depending on the action selected, one or both adjacent fields may become available to specify the needed parameters. Each method is available as an Add or Remove operation. After choosing an action and supplying any needed parameters, click the button to initiate the action.
Notes:
- While changing the group by typing in the range (middle left) you must press enter while inside the field to complete the change. Use commas to separate points and use a dash to indicate a range. For example 2,6-9 indicates point 2 along with points 6, 7, 8 and 9.
- If you make undesirable changes, close the dialog and issue the CAD undo command.
 Point Group Manager