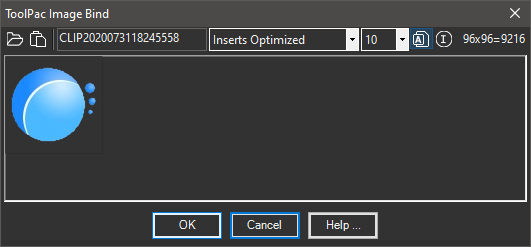
This tool is used to convert small images (such as logos) to blocks containing 2dSolids for pixels, eliminating the need to provide an external raster image file with the DWG. Even though the tool optimizes the results, processing large images can result in blocks that insert slowly and significantly increase drawing sizes. In the event the user tries to process a large image it can degrade AutoCAD performance. It is recommended the process be ran in a separate session of AutoCAD to avoid potential data loss with other drawings loaded.
Keyboard Command: ImgBndBlk

Procedure:
- Initialize the Image Bind tool.
- Open an image file or paste one from the clipboard.
- Select desired options (details below).
- Choose the button to process.
Details:
- Toolbar Icons:
- File Select: Selects an image file on disk.
- Clipboard Paste: Pastes the contents of the clipboard (replacing the existing).
- Block Name: The AutoCAD block name to use.
- Optimize Results: Choose an output method from the drop down list. The default creates the smallest drawing.
- Color Tolerance: A number (1-128) repesenting the amount of color tolerance (see notes below).
- Insert Toggle: If this button is pressed, the tool will prompt for insertion parameters after the dialog closes.
- Image Analysis: Evaluates the image and determines the count and percentage of pixels that will be drawn.
- Size: Indicates the width x height of the image file along with total pixels.
- Preview: Shows a representation of the image before processing.
- Commands: Click to build the block and begin insertion.
Notes:
- The program ignores white pixels (RGB:255,255,255). If you set the color tolerance to a number greater than 0, it will also ignore near-white pixels. The higher the tolerance value, the more likely a light pixel will be ignored.
- If you build a block of an image, consider WBlocking it for use in other drawings.