Used to import pages from a single PDF or manage multiple PDF files and apply various processes to pages. Details of each section of the dialog are listed below.
Keyboard Command: ImpPdfFil
| Insert Tab | Tools Tab |
|---|---|
 |
 |
Insert Tab:
Imports an Adobe Portable Document File into the current drawing.
- Select this tool from the Import menu.
- Choose the button and select the PDF file.
- Select the desired page and confirm in the preview window.
- Specify insertion point and other parameters.
- Choose the button.
- If additional pages exist, repeat at step 3.
- Choose the button to close the dialog.
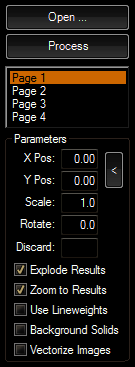
- Open: Displays a file selection dialog to choose the PDF to open.
- Process: Begins processing the currently selected page of the open PDF.
- Pages: Displays a list of pages found in the PDF, choose the desired page before processing.
- Parameters:
- Insertion Point: Pick or type in the coordinates of the upper left corner.
- Scale: Enter the scale factor for the insert.
- Rotate: Enter the rotation angle for the insert.
- Discard: Some PDF files contain numerous small images, sometimes used to fill areas. By putting a numeric value in this field, the program will discard images this size or smaller. The value is total pixels, or width x height.
- Explode Results: Controls whether the program binds the generated results into a block.
- Zoom to Results: Change the current viewport to the extents of the import after processing.
- Use Lineweights: Controls whether widths are assigned on resulting polylines.
- Background Solids: Controls whether the application generates fill areas with the same color as the CAD editor background.
- Vectorize Images: Converts images to linework, useful on mono images.
Notes:
- Vectorization is not perfect, regardless of the product. The image quality can dramatically affect the results. If the image has been screened or is a low resolution, your results can actually look worse than the image itself.
- Special characters like mathematical symbols are represented by proprietary fonts (which cannot be legally extracted).
- If the PDF file opened contains GeoPDF information, a drop down will appear under the viewer window allowing you to select the desired matrix. If a system contains the term UTM it will automatically be selected.
Tools Tab:
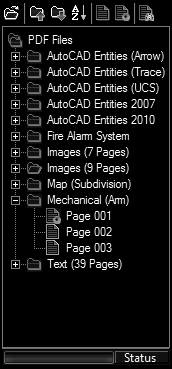
This tool is primary right click driven. This is by design because the available options change depending on whether you have clicked on a page node, a (PDF) document node, or the top node. Each level is shown with a different icon and when the status of various nodes change, so does the icon. Each level has various options, some may be available at one level and not available at others.
The primary icon flag to watch for is the process marker flag. It can be set for a single page while a page is selected, all pages in a document while right clicking the document, or for all pages on all loaded documents when issued at the top node "PDF Files". In the example above, Page 001 is marked, the others are not.
All further references to document refer to a PDF file that is saved on disk and loaded into the PDF Managers tree.
Files Toolbar:
| Icon | Item | Description |
|---|---|---|
| Load: | Loads one or more selected documents from disk using a standard windows open dialog. | |
| Move Up: | Moves the selected document up one position on the list. | |
| Move Down: | Moves the selected document down one position on the list. | |
| Sort: | Sorts the loaded documents alphabetically in ascending order. | |
| Clear All: | Clears the process status on all pages of all loaded documents. | |
| Select All: | Sets the process status on all pages of all loaded documents. | |
| Find: | Searches the text contents of all loaded documents for a specified string. This process first clears the process status of all pages in all documents. If a page contains the search string it will be flagged with a special star icon for easy identification.
After this process is complete, single clicking a page designated found will show the page in the viewer with the search term highlighted in yellow. This highlight also remains displayed as you change the zoom level in the viewer. |
Function Details:
The columns at the far right indicate whether that function is available at that level.
| Item | Option | Description | Top | Page | |
|---|---|---|---|---|---|
| Clear: | Removes the process tag from the page(s). | ✔ | ✔ | ✔ | |
| Select: | Sets the process tag on the page(s). | ✔ | ✔ | ✔ | |
| Assemble From: | Loaded Files: | Creates a new document from the selected pages in multiple loaded documents. Before choosing this option you should control the order of the documents using the move up/down icons, then mark the pages you wish to include. You will be prompted for a file name to use for the newly created document and it will be loaded at the bottom of the tree upon completion. | ✔ | ||
| Image Files: | Creates a new document from selected images. These can be of various formats such as BMP, PNG, etc. After selecting the images you will prompted for an output file for the document. After completion the new document will be loaded in the bottom of the tree. | ✔ | |||
| MultiPage TIFF: | Creates a new document from a single selected multipage Tagged Image File. After selecting the multipage image file you will prompted for an output file for the document. After completion the new document will be loaded in the bottom of the tree. | ✔ | |||
| Export To: | Drawings: | Creates a new drawing file for each of the selected pages in multiple loaded documents. These DWG files are placed in the folder the document resides in and is named document name (page number).dwg. The geometry from the PDF page is placed in Model space of the resulting drawings. | ✔ | ✔ | |
| Images: | Creates an image file for each of the selected pages in multiple loaded documents. These image files are placed in the folder the document resides in and is named document name (page number).ext. The file type created along with the image resolution are controlled from options in the top node (see below). | ✔ | ✔ | ||
| Layouts: | Creates a new layout in the current drawing file for each of the selected pages in a document. The layouts created are named document name (page number). The geometry from the PDF page is placed in the paper space of the created layout and will be placed as a block at the scale provided by the user.
This function requires a pre-requisite. Before processing you must create a layout named Source and should do a page setup on the source layout as it will be copied to create the layouts for the results of the automation. |
✔ | |||
| Extract To: | Images: | Extracts the images contained on each selected page in multiple loaded documents. Keep in mind each page can potentially contain hundreds of images. These image files are placed in the folder the document resides in and is named document name (page number-image name).ext. The image name comes from the PDF document content stream and typically have names like Im0, Im1, etc. The file type created is controlled from options in the top node (see below). | ✔ | ✔ | |
| Pages: | Extracts the selected pages in multiple loaded documents. Each page of multipage documents is written to a separate document file. These image files are placed in the folder the document resides in and is named document name (page number).pdf. | ✔ | ✔ | ||
| Text: | Extracts the text content contained on each selected page in multiple loaded documents. Some pages may contain thousands of lines of text or (depending on the source document and creator) may contain none. These text files are placed in the folder the document resides in and is named document name (page number).txt. | ✔ | ✔ | ||
| Image: | Format: | Choose the desired image format to be created. Each format has its strengths and weaknesses depending on the source page content. For example is the source content is black/white the GIF format can be smallest. The best overall format and default is PNG (Portable Network Graphics). | ✔ | ||
| Resolution: | Resolution is a percentage multiplied by the page dimensions (which can vary). The resulting image pixels is page dimension x chosen factor. For example if a source page is 17"wide x 11" tall and the resolution is 100, the resulting image is 1700x1100 (17*100)x(11*100). Choose a smaller value for smaller images, and vice-versa. | ✔ |
Notes:
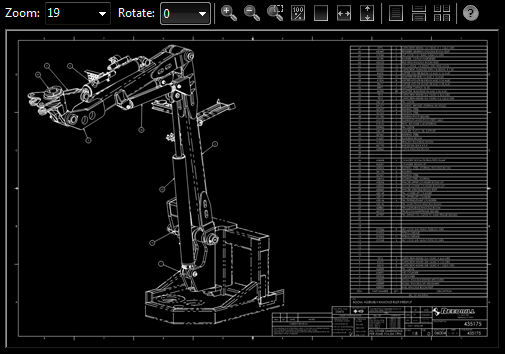
- Single click a page to display it in the viewer.
- Double click a page to toggle its status from selected or clear.
- Double click a document to expand or collapse its pages.
Viewer:

Viewer Icons:
| Icon | Item | Description |
|---|---|---|
| Zoom In: | Zooms into the page at the points picked. | |
| Zoom Out: | Zooms out of the page at the points picked. | |
| Zoom Window: | Zooms into a window picked. | |
| Display Full: | Displays the page at 100% zoom level. | |
| Display Page: | Displays the entire page. | |
| Display Width: | Zooms to show the entire width. | |
| Display Height: | Zooms to show the entire height. | |
| One Page: | Displays in single page mode. | |
| One Column: | Displays in one column mode. | |
| Two Columns: | Displays in two columns mode. |