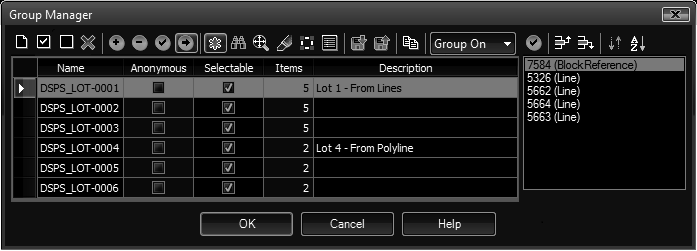
Dialog based tool including a grid for the data with in-cell editing and more. Also includes the ability to reorder objects in the group with a simple move up/down system.
Keyboard Command: ObjGrpMgr

Icon Details:
- Create New: Used to create a new group record. The initial name will be that of a newly created anonymous group. The name is highlighted and selected so you can begin typing in a new name. After creating a new group you can optionally change the description and selectable fields.
- Select All: Selects all rows in the group list spreadsheet.
- Clear All: Clears (de-selects) all rows in the group list spreadsheet.
- Delete Rows: Deletes previously selected groups (rows). You can select multiple groups for deletion by ctrl+clicking the row header area to the left of the rows.
- Add Objects: Temporarily dismisses the dialog and prompts to select objects. Select the desired row before initiating this tool. After object selection the dialog returns and the item count for the group is updated.
- Remove Objects: Works similar to the add method above, except it's used to remove objects from the selected group (row).
- Mark Begin: This option allows you to mark your place in the drawing. Later when you choose the create function, all objects added to the layout since the mark are automatically added to the group as it's created. So simply place the mark, add your objects, then add the group. Note that objects added to other layouts are not counted and you must be in the same space marked when creating the group. In other words begin in model space, add objects, switch if desired, but return to model space to create the group. Only one mark can be active at a time.
- Order Panel: In nearly all cases you will leave this turned off (it's turned on in the example above). See the section below on object ordering.
- Include UnNamed: This toggle is turned on by default and controls whether anonymous groups are displayed in the grid.
- Find Groups: Finds (and selects the rows) of the groups a selected object belongs to.
- Zoom Group: Zooms to the extents of the objects contained in the selected group.
- Highlight: Highlights the objects contained in the selected group(s).
- Select: Selects (and grips) the objects contained in the current group.
- Backup: Saves group information into objects as EED (Extended Entity Data). This data survives copyclip/pasteclip and wblock/insert operations. Used in conjunction with the Restore function (below) you can carry group information with objects.
- Restore: Restores group information from objects (that were backed up using the tool above). You will be prompted whether to remove the backup information during the restore process.
- Copy: Copies the contents of the grid to the clipboard, ready to paste into a spreadsheet or other windows application.
- Variable: Controls the status of the PICKSTYLE variable, which determines whether groups are on/off.
ReOrder Processes:
- Procedure: The steps below demonstrate a typical reorder process.
- Make sure the ReOrder panel is visible using the (>) icon.
- Select the row of the group to reorder.
- Optionally zoom extents to the group.
- Optionally drag the dialog away from the geometry.
- Select an object in the list (it's object will highlight in the drawing).
- Click the Row-Up or Row-Down buttons as desired.
- Repeat at step 5 until complete.
- Click the accept changes icon (✔) to commit changes.
- Accept: Commits reorder changes to the group.
- Row Up: Moves the current item up one row.
- Row Down: Moves the current item down one row.
- Reverse: Reverses the order of the objects.
- Sort: Sorts the objects based on handle value (which is typically the order they were created).
Other Processes:
- Renaming: To rename a group (even an anonymous one) click once on the displayed name to select the record, then again to begin editing and press enter when finished. If an anonymous group was renamed the adjacent toggle will change automatically. Note that you can also change a standard group to anonymous by entering * for the name.
- Selectable: Simply click the toggle to change select-ability of a group.
- Descriptions: Double click the description field to begin editing.
Buttons:
- OK: Commits all changes made in the dialog. The AutoCAD undo command can restore the previous state if desired.
- Cancel: Cancels all changes made in the dialog.
- Help: Displays this help file.
Notes:
- The Anonymous and Items columns are for information purposes only and cannot be edited.
- In some drawings, there can be thousands of groups (typically anonymous and empty). This tool checks the count before startup and asks before displaying more than 1000 groups. The command line Purge Empty tool below is the quickest way to remove them.
 Group Manager (Dialog)