Display Options
PD Grade was built for simplicity in the user interface while still having the ability to be completely customizable. The most common configurations are set as default and any special requirements for display can often be set by the installer or even the operator.

Setup Grade Views
Not available in PD Grade
Text Display Options
Choose the language that PD Grade will use as well as which information is displayed on the plan view.
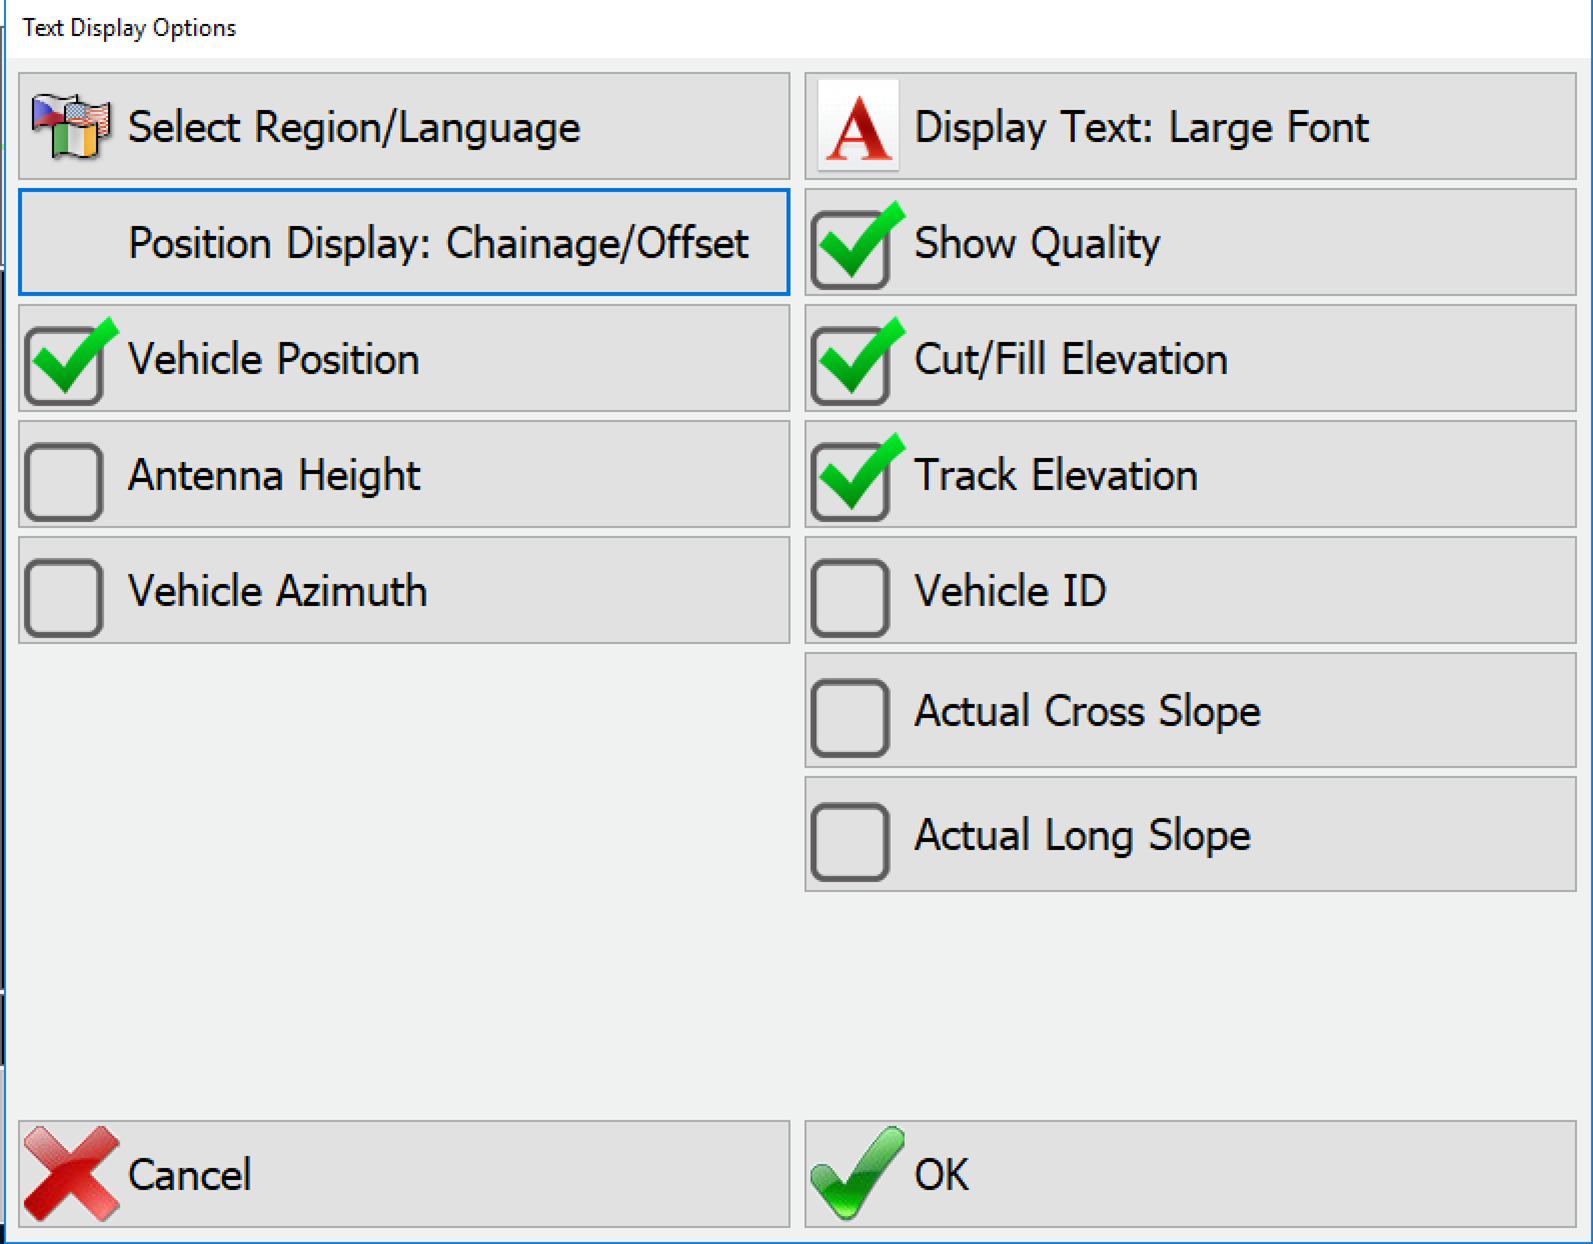
- Select Region/Language: Choose from available translations.
- Position Display: Orders the local coordinates displayed in the main view. Select from Northing, Easting|Easting, Northing|Chainage/Offset.
- Vehicle Position: Toggles the main view position On or Off.
- Antenna Height: Toggles the main view text for the antenna offset from the ground on or off.
- Vehicle Azimuth: Toggles the main view text for the direction of travel on or off.
- Display Text: Sets the font size for text.
- Show Quality: Toggles the main view text display for the GPS quality on or off.
- Cut/Fill Elevation: Toggles the main view text display for the Cut/Fill on or off.
- Vehicle ID: Toggles the main view text for vehicle ID on or off (deprecated with streaming).
- Actual Cross/Long Slope: Toggles the main view text display of the pitch and roll of the machine on or off.
Reverse Video
This changes the coloring of the monitor to make the screen easier to see in different light conditions.
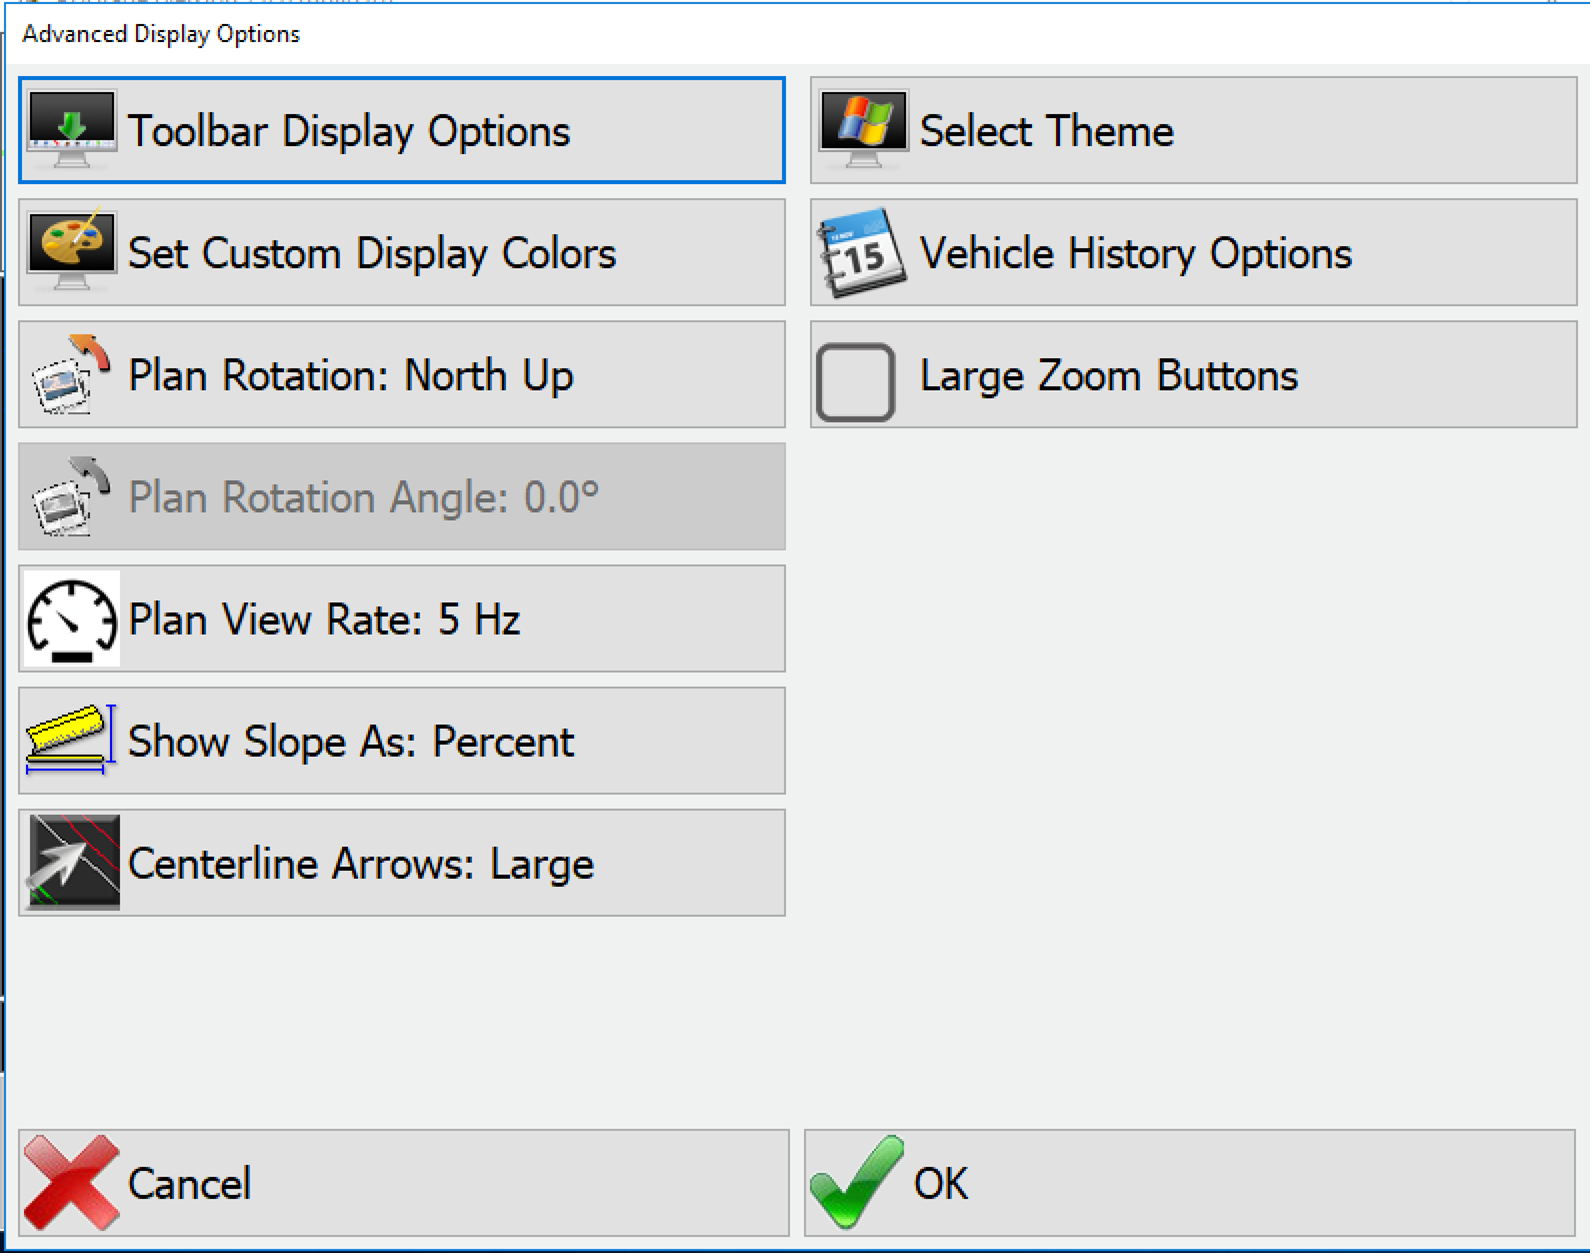
Advanced Display Options
Settings for manually configuring many specific details of the display.
Toolbar Display Options
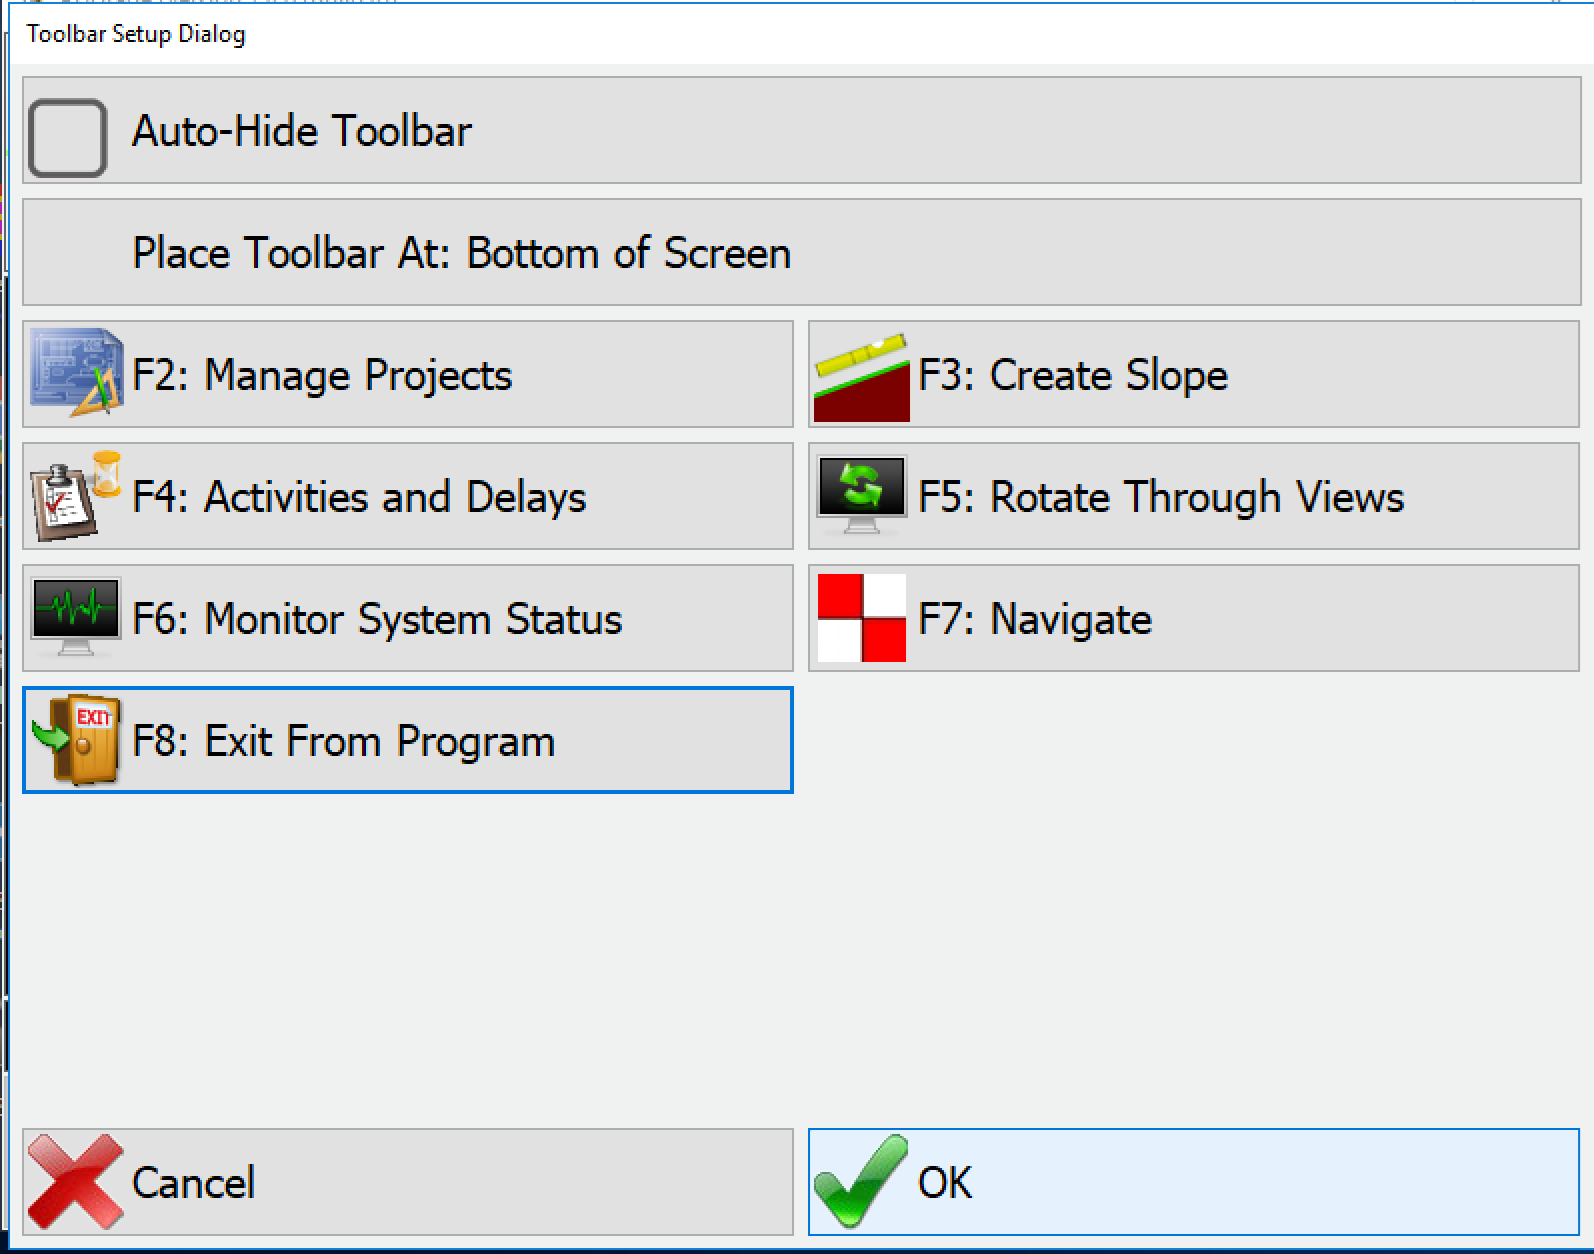
- Auto-Hide Toolbar: When selected, the toolbar on the main view will collapse when not in use. Press the menu button to expand it for use.
- Place Toolbar At: Select the position of the toolbar. The options are the top and bottom of the screen.
- Toolbar (1,2,3): Grade supports stacked toolbars, up to 3. Toolbar 1 will be the primary toolbar, 2 and 3 will be visible, when enabled, above toolbar 1. Press the Target button above Tools to expand and see all enabled toolbars.

Toolbar Expand Display - Enable Toolbar: Toggles if the toolbar will be shown when the expand button is pressed.
- Toolbar Buttons: The toolbar buttons are all configurable and assigned to the function keys:
- F2-F8
- F9-F16
- F17-F24
Buttons allow the operator to quickly access features from the Tools, Adv. Tools, Options and other menus. Press the button and select the desired button to change them from the defaults.
Expanded Toolbar with toolbars 1 and 2 enabled
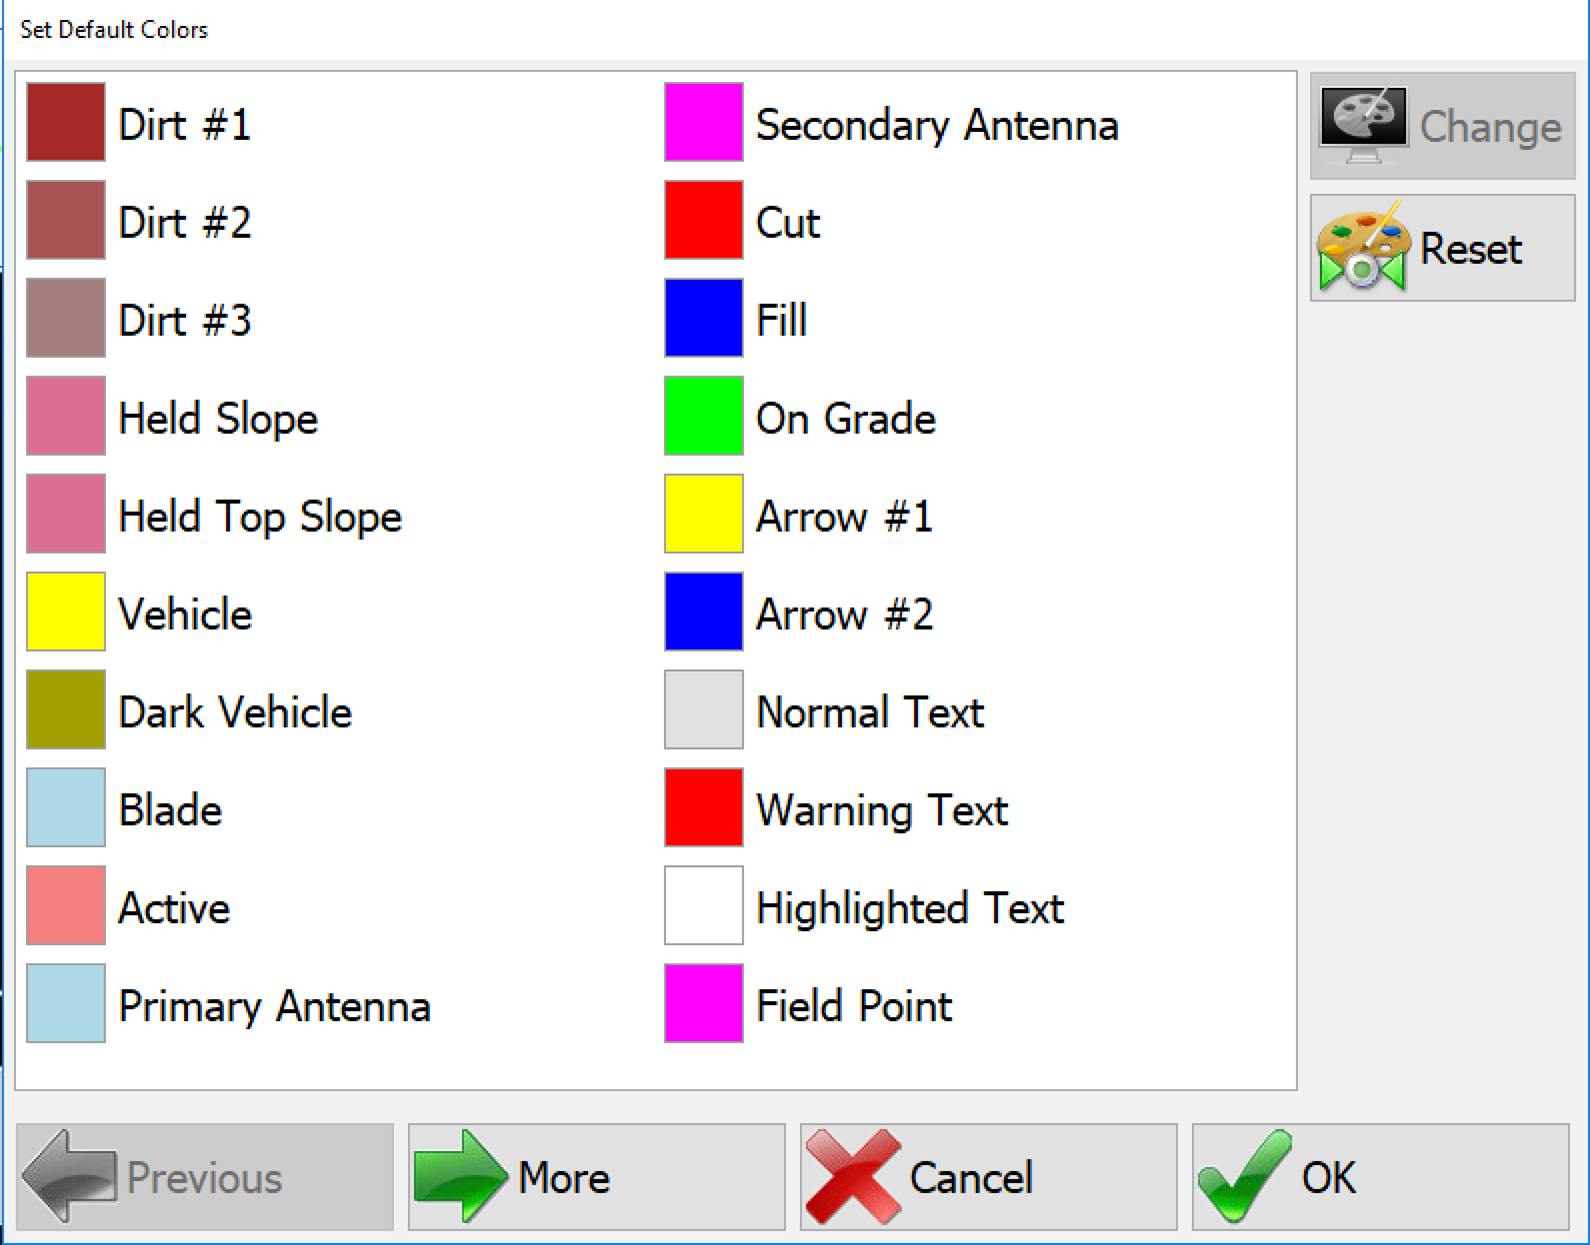
Set Custom Display Colors
In this menu you can change the colors of nearly every item other than static icons. To select a new color, highlight the item you wish to change and then press the Change button. You will be given a list of available colors to choose from. Pressing Reset will restore default colors.
- Plan Rotation: Choose which direction (North, 30°, etc) is at the top of the plan view or choose Moving Map so that the azimuth of the machine is always facing the top of the map Plan.
- Rotation Angle: Enter the desired angle to be placed on top if applicable.
- Plan View Rate: Choose the update rate of the plan view. This can be adjusted to improve performance on a control box with less resources.
- Show Slope As: Percent, degrees, rise/run, run/rise.
- Select Theme: Choose a Windows theme.
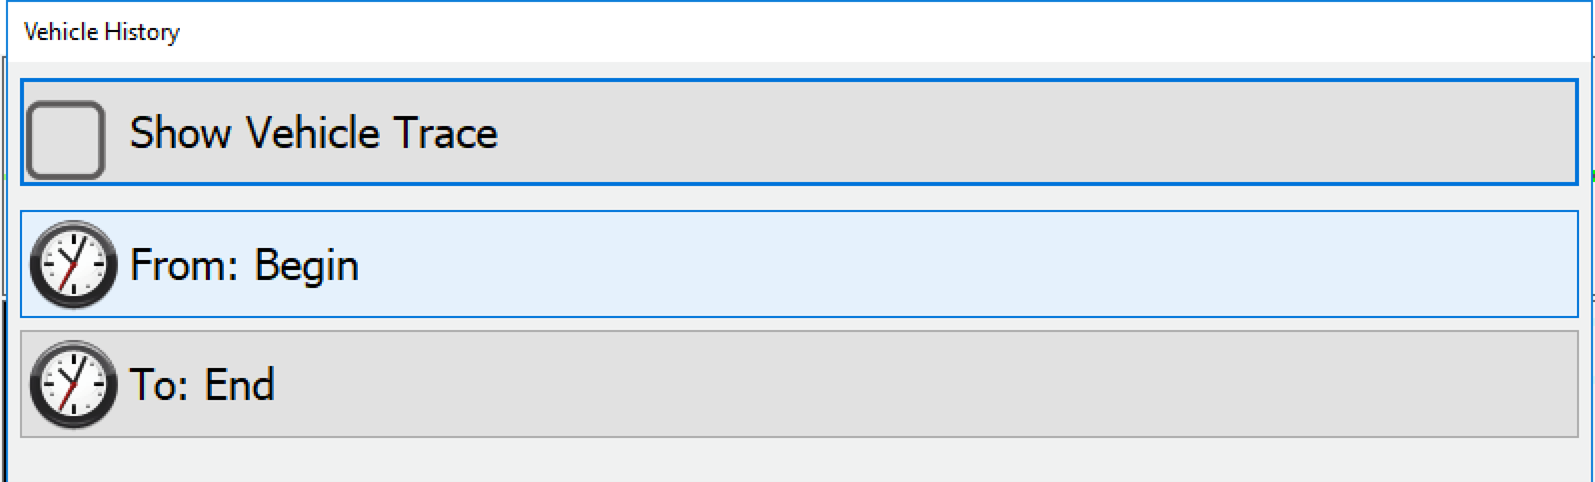
Vehicle History Options
When selected, the machine will leave a trail of dots where it has already been. The From option allows the user to select an amount of time back from now that the dots will remain on screen.
For example, if you set it to two hours before, the dots for only the last two hours will remain on screen, and the rest will not be shown.
- Large Zoom Buttons: Changes the size of the zoom buttons on the main screen to make them easier to press.
Vehicle Tracking
Status Bar Setup
Set up the status bar to provide extra information at a glance. Check the options to show these values along with the default info:
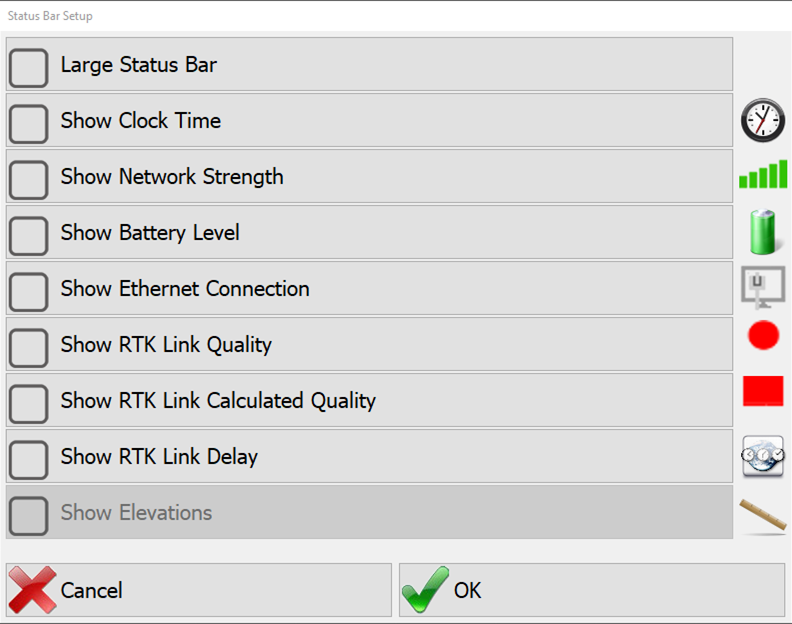
- Large Status Bar
- Show Clock Time
- Show Network Strength
- Show Battery Level
- Show Ethernet Connection
- Show RTK Link Quality
- Show RTK Link Calculated Quality
- Show RTK Link Delay
- Show Elevations

Navigate Options
- Show Attribute in Plan: (None, ID, Desc, ID & Desc) Adds the information on the plan view for the piles.
- Auto-Zoom to Target: As the machine approaches the point, the screen will automatically zoom in based on configured tolerances.
Example: the software can be set-up to zoom once when the machine is within 10 feet of the target and then again when the machine is within 5 feet of the target.
- Auto Zoom Setup: Distance To Point and levels of zoom.
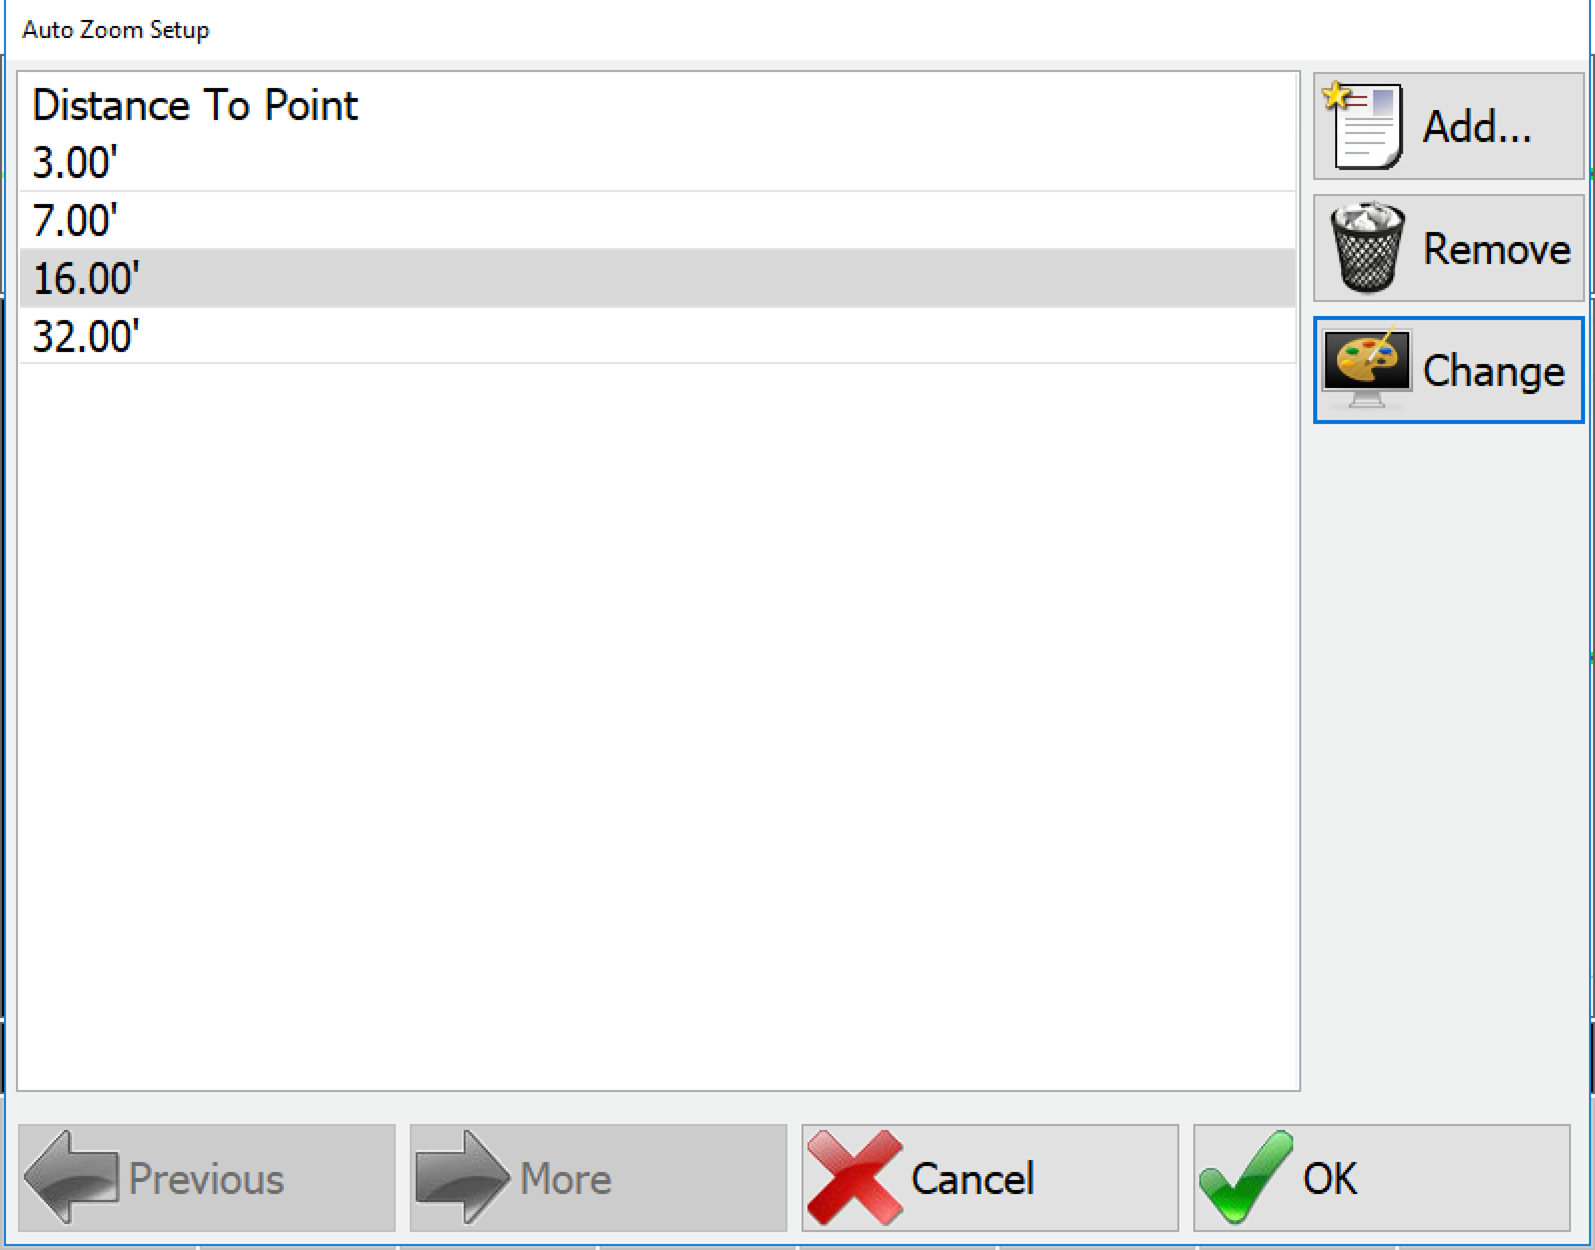
Auto Zoom Setup Press Add… to add a new auto zoom level. You will be prompted to add a new distance from the point. You can also edit the existing distances by pressing Change.
When the hammer gets within the distance to the point, the plan view will auto zoom to that scale.
Project Options
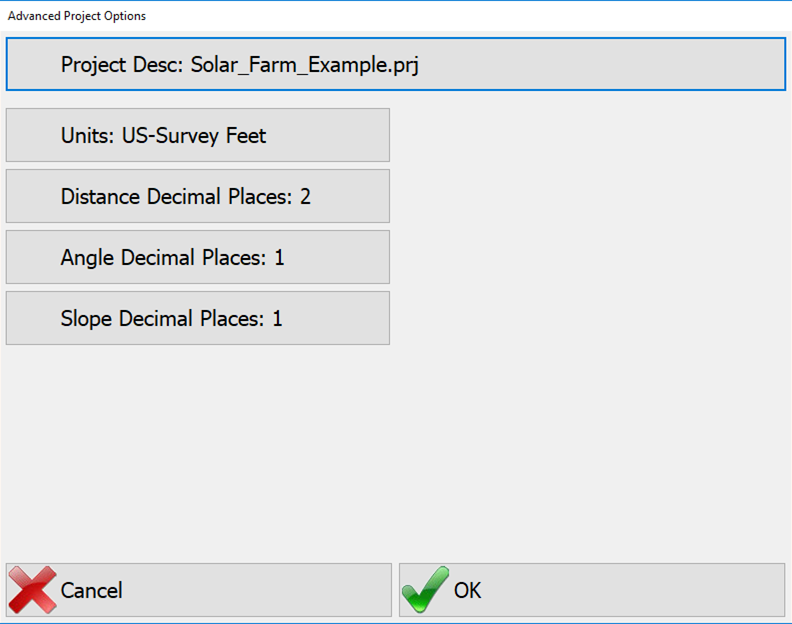
- Project Desc: Here you can set the project description that will appear in the toolbar.
- Units: You can change the units for the projects here.
- Distance/Angle/Slope Decimal Places: How values for each item will be displayed to the operator.
Report Options
- Logo: Add an image file here of your company logo and it will be added to reports when saved as a PDF.
System Options
Communication Options
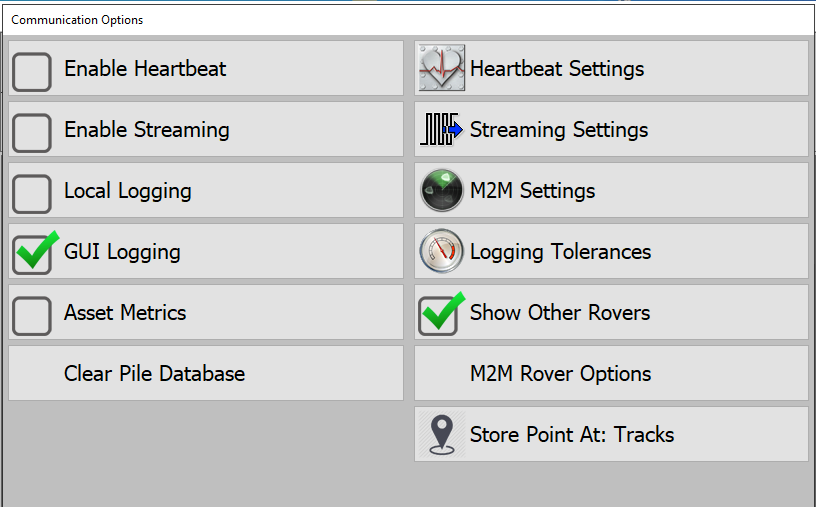
- Enable Heartbeat: (deprecated) Heartbeat is the protocol for data transfer that has been replaced by streaming as of the writing of this manual. The functionality has been left in to facilitate backwards compatibility.
- Enable Streaming: Streaming is the protocol for communicating data from PD Grade to Carlson Command. Streaming data includes the position information as well as all time events such as Operator login, activities, delays, and down codes. This does not include the Pile information.
Data is streamed directly to the Carlson Stream Server as long as the connection is valid and connectivity is strong enough for packets to get through. In the case that connectivity is broken, streaming logs will be created in:
[datapath]\logswith the format:
DBStreamServer_[uniqueID].smcbackOne file will be created for each session of PD Grade and will be cycled at midnight UTC. As soon as connection is restored the oldest data will be streamed until the stream catches up with the current time. Once data is streamed in the .smcback files will be removed.
- Local Logging: When enabled PD Grade will write all position and time event data to a local log in:
[datapath]\logswith the format
log-[ID]-YYYY-MM-DD.logThese logs are used to manually transfer data back to Carlson Command.
- GUI Logging: When enabled PD Grade will write all user interface actions to a local log in:
[datapath]\logswith the format
gui-[ID]-YYYY-MM-DD.log - Asset Metrics: Turns on request to Command to display custom data stream in text display area.
- Clear Pile Database: (only available when streaming is disabled) backs up the current piles.db file and creates a new one. Should be used when moving a PD Grade machine from one non-command site to another.
Heartbeat Settings (deprecated)
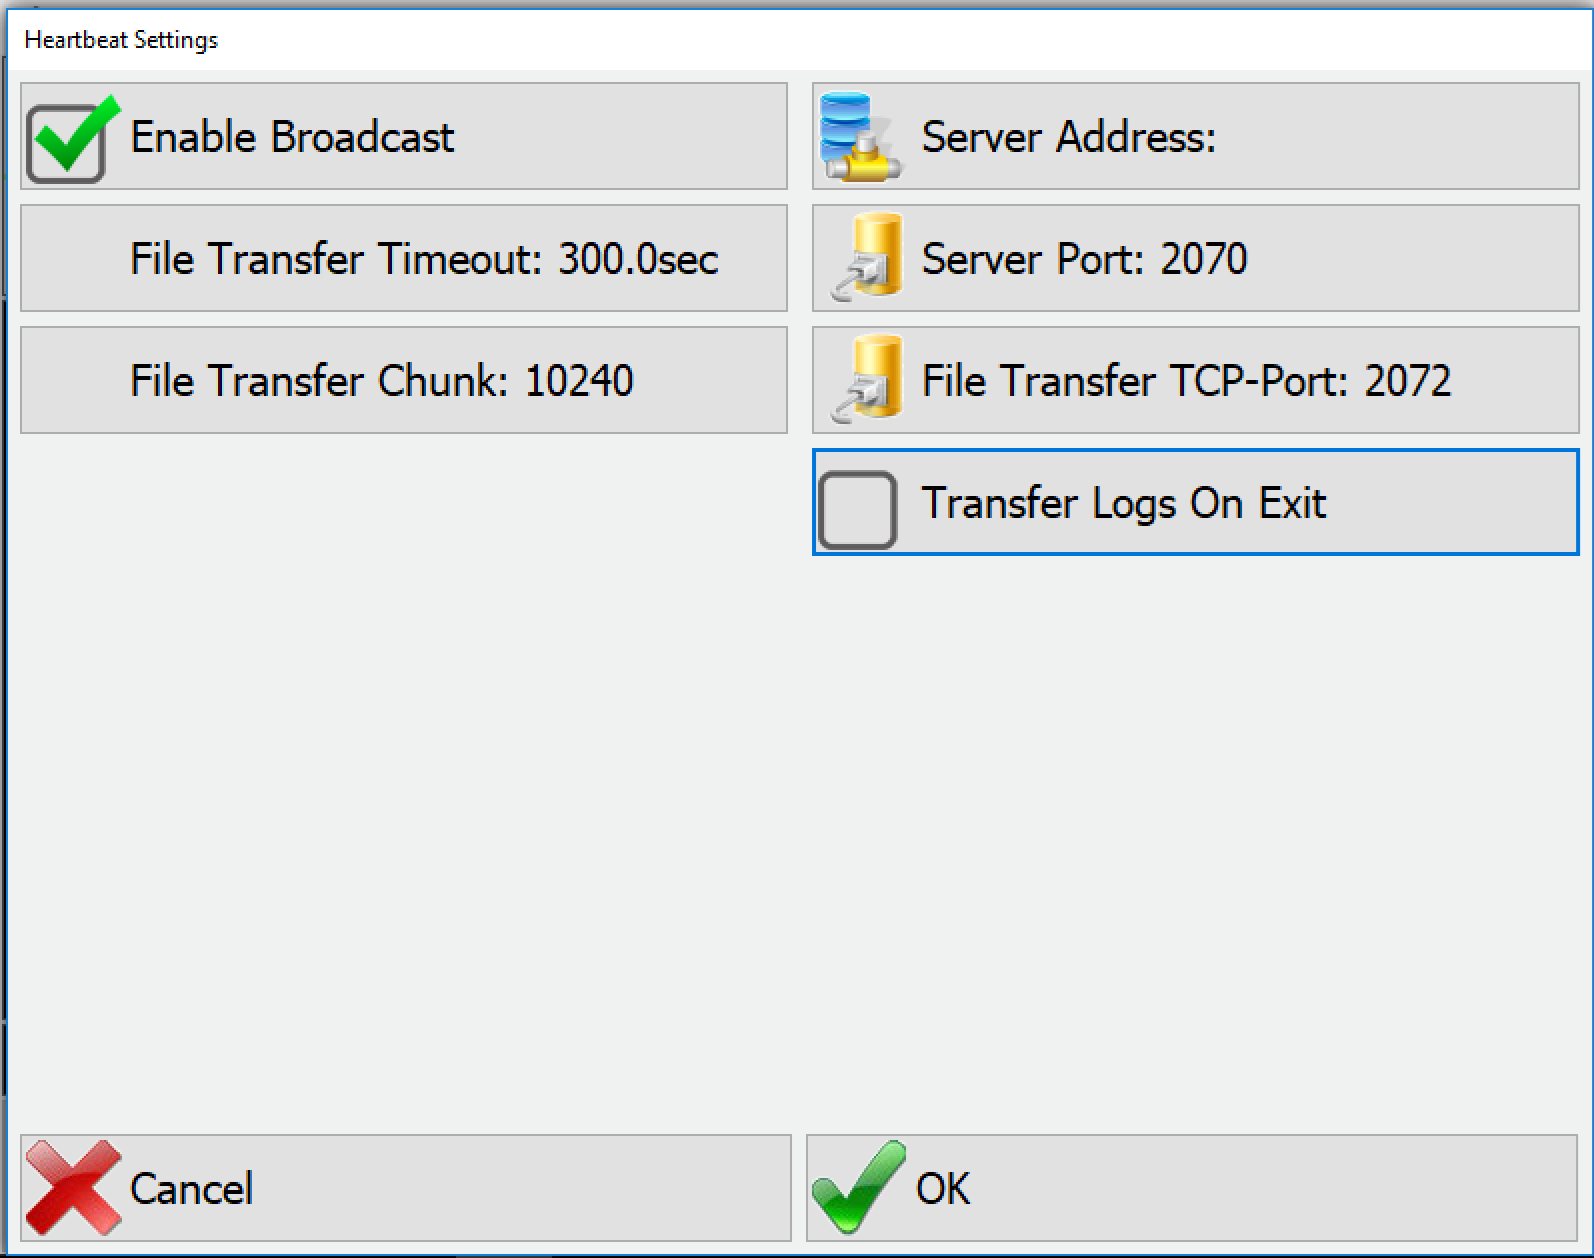
- Enable Broadcast: This determines whether or not PD Grade sends UDP Broadcasts of Heartbeats on the network. This feature will still work for showing other rovers on a local network.
- File Transfer Timeout: The amount of time before a transfer is canceled and tried again. This setting requires a Heartbeat server.
- File Transfer Chunk: The amount of data sent in each packet. This setting requires a Heartbeat server.
- Server Address: This is the address where the Heartbeat server resides.
- Server Port: This is the TCP/IP port PD Grade that will transmit and receive Heartbeat messages to or from the Heartbeat server. These are UDP messages. This must be the same port configured on the Heartbeat Server.
- File Transfer TCP-Port: This is the TCP/IP port PD Grade and the Heartbeat Server will use to transfer logging and project files between the PD Grade Computer and the Server.
- Transfer Logs on Exit: This will force the log files to transfer back to Heartbeat before PD Grade will allow the control box to shut down. This should only be checked for legacy installs.
Streaming Settings
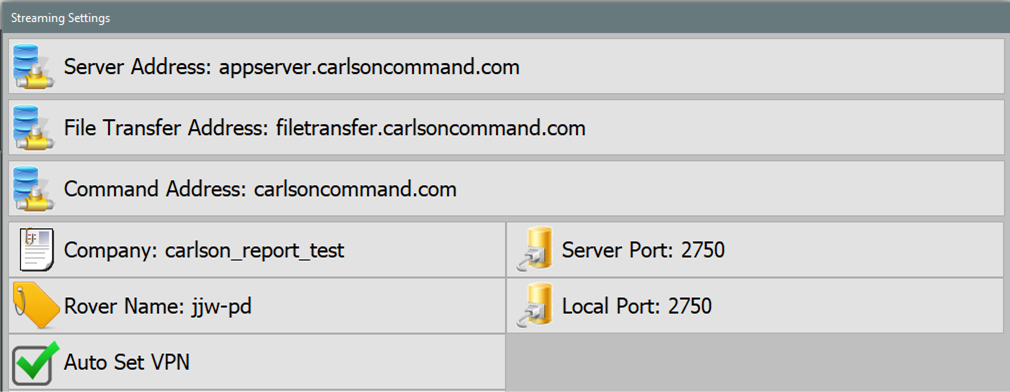
- Server Address: The location on the network of the Stream Server. The Carlson Cloud location is:
appserver.carlsoncommand.com(this should be used for all Command Cloud machines) - File Transfer Address: The address of a stream server with a route back to the machine. This will be the same as the server address for intranet setups or machines with static IP addresses. The address on the Carlson Command Cloud is:
filetransfer.carlsoncommand.com - Command Address: The address of the Carlson Command web server. For the Carlson Cloud this address is:
carlsoncommand.com - Server Port: This is the port the server is listening for streaming messages on. The Carlson Cloud Server listens on port
2750. This is the default. - Local Port: This is the port your machine will be listening on for all streaming communications.
- Company: Carlson Command and the Stream Server support multiple sites. Setting a company allows different machines to stream into the appropriate site. This site name will be assigned if you are using the Carlson Cloud.
- Rover Name: This is the unique name for your machine. This must match a rover name created for the company in Carlson Command.
- Logging Level: Activity on the connection to the Stream Server is logged. The amount of information logged has three different levels:
- Errors
- Debug Info
- Everything
For normal connections with no issues Errors is enough. Increase the logging level when more troubleshooting is needed. This causes the log files to get quite large. Once the issue is found this should be returned to Errors.
- Auto Set VPN: (Recommended) Select this option and PD Grade will request the appropriate OVPN file from the Command Server, and connect OVPN.
- OVPN File: Click to manually select an .OVPN file downloaded from carlsoncommand.com. Select the file from a remote USB drive or from a location on the control box.
- Encrypt Stream Messages: When selected, this will encrypt all communication between the Stream Server and the machine.
Note: May affect performance.
M2M Settings
PD Grade machines support sharing position data between each other with or without the Carlson Command back office.
Note: Unlike previous versions, this will not connect PD Grade to the syncing functions for piles. This is handled in Carlson Command in Tools → Fleet Management → Fleets/Machines. Select the machine and select Pile from Stream Agents.

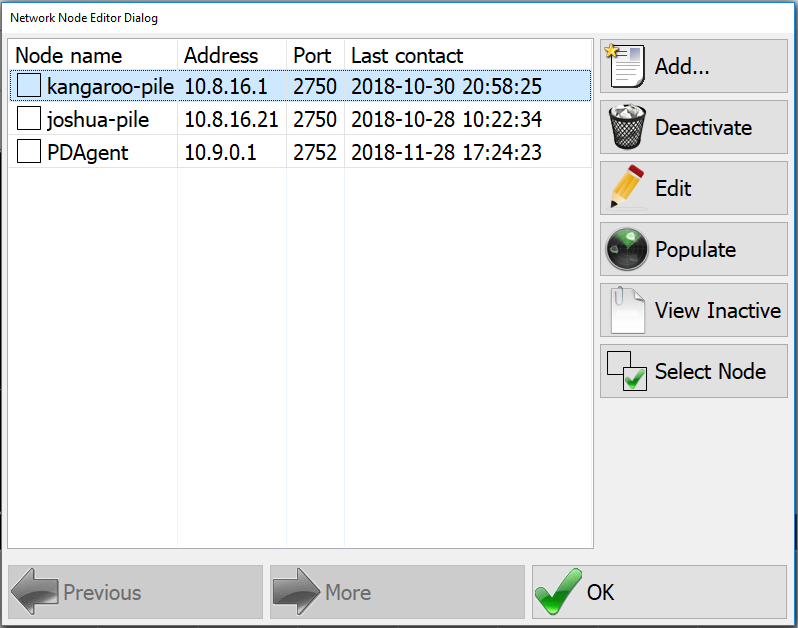
- Press Add… to enter a new rover to communicate with.
- Enter the current IP address and the Local Port of the machine you want to communicate with.
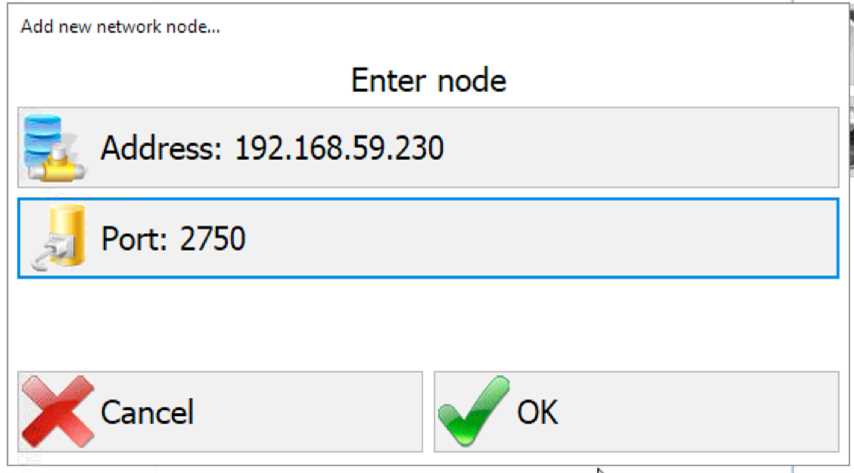
Add Network Node - When you press Populate your machine will attempt to communicate with the other machine, and will fill in the Node Name and Last Contact.
- Select the node to Remove or Edit the existing nodes. Removing a node will make it part of the inactive list. Nodes on the inactive list will not be part of the machine to machine sharing.
- Press View Inactive to see the list of deactivated nodes. Select the node again and press Activate to move it back to the active tab.
Logging Tolerances
PD Grade records a position for logging and streaming as a series of conditions are met. Each time one of these tolerances are hit a position is logged or streamed.
- Time Tol: Time in seconds (e.g. Every 15 seconds a point will be recorded).
- Distance Tol: Distance in feet or meters.
- Elevation Tol: Elevation in feet or meters.
- Azimuth Tol: Azimuth change in degrees.
Show Other Rovers
This setting when checked will show the other machines on your machine's plan view.
Store Point At: This setting sets the logged position location from a set of possible points. The options are:
- Hammer
- Tracks: offset from GPS to the center and ground
- Tracks (True GPS): offset from GPS to the ground (no center offset)
Admin Password
The Admin password is a password to protect advanced levels of configuration in the software from operator use. This password is numeric only and must be at least 5 digits long. This blocks access to these menus:
- Product License
- Advanced Tools
- Project Options
- System Options
- Exit
User Password
The User password is a password to prevent the operator from leaving operational screens and accessing any configuration. This password is numeric only and must be at least 5 digits long. This blocks access to any menus other than what is on the toolbar.
Prompt for Start Point
When checked Grade will prompt the user for a position to start the simulation. This is only used with GPS Simulation for demonstration purposes.
Password on Shutdown
If checked, the system cannot be shut down without a password.
Allow Ignition Shutdown
This option will trigger a shutdown when triggered by ignition. This must be configured with the ignition wire of the machine. Consult the installer for more details.
Advanced System Options
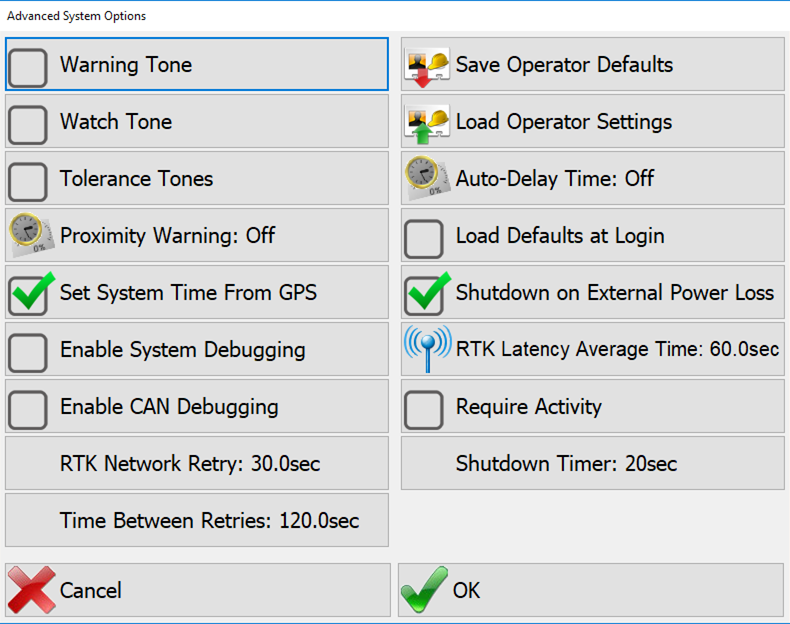
- Warning Tone: This allows an audible tone to sound when the machine enters a warning zone. Create warning zones in CAD by making a closed polygon on a layer called warning. activity
- Watch Tone: This allows an audible tone to sound when the machine enters a watch zone. Create watch zones in CAD by making a closed polygon on a layer called watch. activity
Note: Create watch and warning zones in Command under Command → Design → Watch/Warning Zones.
- Proximity Warning: This warns the operator about nearby vehicles. Streaming and M2M must be enabled in the UOA. Enter a time-to-collision with another vehicle.
- Set System Time From GPS: This setting allows PD Grade to set the Windows system time from the time received in the messages from the GPS.
- Enable System Debugging: This creates a debugging log that is used for testing and debugging purposes. This file is found in
[data path]\Diagnosticand will be called$debug[auto-incremented number].txt. - Enable CAN Debugging: TODO
- RTK Network Retry: This is the amount of time after an RTK network is lost that PD Grade will attempt to reconnect.
- Time Between Retries: This is how long PD Grade will wait between connection attempts.
- Require Activity: Create the Activities list in Command and send it to the machines to access in the Tasks button on the toolbar. If this setting is checked, PD Grade will always require the operator to enter an activity, delay or downcode before beginning work, closing the program, or shutting down.
- Save Operator Defaults: Saves the current operator's settings to the default operator configuration file.
- Load Operator Defaults: Loads the settings from the default operator configuration file.
- Auto-Delay Time: The number of seconds of sitting idle PD Grade will wait before requiring the operator to enter a delay code.
- Load Defaults at Login: Loads the default operator configuration at every login.
- Shutdown on External Power Loss: This will trigger the operating system to shutdown if external power loss is detected. The operator will have 20 seconds to cancel the shutdown.
- RTK Latency Average Time: This setting will allow PD Grade to calculate RTK latency averaged over the time period set. If latency is available in the GPS driver, that latency will always be used.
- Shutdown Timer: How long after loss of ignition PD Grade will wait to shut down the operating system.
Webview Options
The Webview is a static browser that shows a single web page. Use this to add content to Grade from an outside web server, or a page in Command.

- Webview Label: Use this to label the button to the Webview to something appropriate (i.e. Productivity Report).
- Default URL: Enter in the location of the web page to view.
- Enable Webview: Toggle the availability of the Webview button.